Transpose Transpose ▲▼  

FAQ

Getting started
  1. Install the extension in Chrome (Pro) or Chrome/Edge (Classic).
  2. Open a video page (e.g. YouTube).
  3. Open the extension from your browser toolbar.

Getting started

If it doesn’t start immediately

  • Refresh the page.
  • Start playback before opening the extension.
  • Ensure your browser is up to date (latest Chrome/Edge).

Free: Works on desktop Chrome, Edge, and most Chromium-based browsers.

Pro: Available only in Google Chrome on desktop.

getting started install setup

Where can I find the extension?

After installation:

  1. Open Chrome or Edge.
  2. Click the puzzle-piece icon (Extensions) in the toolbar.
  3. Pin Transpose to keep it visible.
  4. Click the Transpose ▲▼ icon to open it.

Transpose extension icon in Chrome/Edge toolbar

install pin toolbar find extension

Is it free to use?

Yes. Transpose Classic is free.

Our Mission: Encouraging Music Making

We believe that making music is for everyone. That's why the core of Transpose is a powerful, free tool for your daily practice sessions. It is our contribution to the music community, to help as many people as possible grow and enjoy playing.

The Classic version contains all the features from the original extension, which we've been improving since 2017.

  • Works on YouTube, Spotify, SoundCloud, Deezer, and many more.
  • Includes pitch, speed, and loop control.
  • Keeps track of your recent history song settings
  • Saved playlists/lists are Pro-only.

Transpose Pro is a new, optional upgrade.

It adds an improved pitch algorithm, plus extra features like formant control, vocal reducer, advanced loops, clips, and saved songs.

Upgrading is not required. Classic users keep the same free experience they always had.

pricing cost free pro classic upgrade

What is Transpose Pro?

Transpose Pro is the paid upgrade for musicians who want more advanced tools.

Classic remains fully functional and free — Pro is an optional upgrade on top, designed for musicians who want higher quality, more precision, and advanced practice tools.

Transpose Pro workspace

Classic includes:

  • Pitch shift ±12 semitones & fine-tune
  • Speed control from 25% to 400%
  • Unlimited loops
  • Works on YouTube, Spotify, SoundCloud, Deezer, local files & more
  • No account required
  • No ads

Pro adds all of this on top:

  • Premium high-quality, low-latency pitch shifter
    • More natural sound, less delay, fewer clicks and artifacts
  • Formant control — change timbre/voice color without changing pitch
  • Vocal Reducer — lower centered vocals in stereo mixes
  • Equalizer — shape the tone with a multi-band EQ
  • Advanced looping with:
    • High-resolution timeline and draggable markers
    • Wait-in counts , laps, and more accurate playback
    • Scrubbing preview when paused
  • Clips & sequences
    • Save fragments with their own pitch, speed, formant, and vocal reducer settings
    • Chain clips into practice sequences (e.g. slow → medium → original tempo)
  • Advanced looping tools — rehearse with multiple markers and loop ranges
  • Saved songs & playlists — organize your library and recall settings instantly
  • Cloud sync
    • Clips, sequences, saved songs, and playlists sync across your signed-in desktop Chrome browsers
  • Custom keyboard shortcuts for faster control
  • Varispeed — links pitch and speed for natural tape-style feel
  • Reference Tuning — match non-standard or historical tuning standards
  • Low Latency mode — minimize audio delay for instrument-following drills
  • Scenes — three customizable panel layouts for different workflows
  • Dedicated Workspace
    • Always on top in the side panel, no popup interruptions
    • Easier access to all Pro features
  • Time Display — precise elapsed time with configurable format
  • Notes — attach personal notes to any song
  • Volume slider & Power toggle for quick control

Free: Works on desktop Chrome, Edge, and most Chromium-based browsers.

Pro: Available only in Google Chrome on desktop.

Summary:

  • Classic = the core free version of Transpose.
  • Pro = the paid upgrade with better sound quality, less delay, and powerful new tools for practice and rehearsal.

👉 Upgrading is never required — but if you want the best experience, Pro is for you.

Start Pro Trial

pro features classic upgrade pitch speed loop formant vocal reducer equalizer clips sequences songs playlists sync

Can I use Transpose on multiple devices?

Yes.

  • Classic works on any desktop or laptop with Chrome or Edge.

  • Pro only needs to be purchased once per Google account.

    As long as you sign in with the same Google account, your Pro access is valid on all your computers. Pro is available only in desktop Google Chrome.

Transpose also works in other Chromium-based browsers (Brave, Opera, Vivaldi).

It is not available for Android, iOS, Safari, or Firefox.

devices sync account multiple computers chrome edge

Is my privacy guaranteed?

Transpose is designed for privacy.

  • Your history and settings are stored locally or in your Google account.
  • Only aggregated usage statistics (Google Analytics) are collected.
  • No personal data or audio is uploaded.
  • We do not sell your data.

We comply with Chrome Web Store policies.

For Pro features like cloud storage, we use Google Sign-In. Please read our privacy policy for complete details.

privacy security data analytics GDPR

Why do some sites need extra permissions?

Some sites restrict direct access to their audio/video elements.

Transpose may request permissions to capture the tab’s audio as fallback.

  • Permissions are required only for media control.
  • No browsing history or personal data is collected.
  • You can revoke site permissions anytime in browser settings.
  • You can also use Settings Data & ResetRevoke Permissions.

permissions privacy security access

Troubleshooting: No media - No sound - Connection error

If Transpose does not connect or shows a connection panel, start with these general steps:

  • Refresh the page.
  • Start playback before opening the extension.
  • Open the video on its dedicated page (not embedded).
  • Ensure you are using the latest Chrome or Edge.

For specific help, see the FAQ item matching the panel shown in the extension — for example "No playable media", "Activation required", "Start playback", or "Pitch not available".

troubleshooting no media no sound connection error not working tab capture

Spotify (Web Player) not working

If Spotify is playing via Spotify Connect (e.g. "Playing on iMac"), the audio is not inside the browser tab, so Transpose cannot connect.

Try this:

  • If prompted, allow site permissions for Spotify.
  • Refresh the page, then open Transpose.
  • In Spotify, switch playback to This Web browser.
  • Start the track first (via Spotify or the Transpose play button).
  • Open Transpose.
  • Pro (side panel): if controls do not reconnect, click the Transpose extension icon in the toolbar to re-activate the tab.

Also make sure you only have one Spotify tab playing.

spotify connect web player no media troubleshooting

Message: "No playable media"

These messages appear when Transpose cannot find controllable media on the current page:

  • No playable media — "This page does not contain playable audio or video."
  • Page not supported — "This page is not supported for direct playback."

What to do

  1. Make sure audio or video is present on the page — navigate to a page that contains media.
  2. Start playback on the page before opening the extension.
  3. If prompted, click Allow access and approve the browser permission dialog.
  4. Open the video or audio on its own dedicated page rather than in an embedded player.
  5. Reload the page and try again.
  6. If the site uses a non-standard or protected player, switch to Tab audio mode as a fallback: click or go to Settings Tab audio mode.

If the problem persists, temporarily disable extensions that may interfere with audio or page execution, such as:

  • VPNs with filtering
  • Audio capture or recording extensions
  • YouTube enhancers, equalizers, or volume control extensions
  • Exam or proctoring software

Some environments intentionally restrict access to media and advanced browser features. This is common on:

  • School or exam devices
  • Work or enterprise-managed browsers
  • Systems with proctoring or lockdown software

Pro (side panel): Navigate to a page with media — the side panel reconnects automatically. If the side panel is unresponsive, click the Transpose extension icon in the toolbar to re-activate the tab, then close and reopen the side panel if needed.
Transpose extension icon in Chrome/Edge toolbar

troubleshooting no playable media page not supported connection tab capture

Message: "Activation required"

This message appears in two situations:

New permission needed

The message "Activate Transpose on this site to continue." means the extension needs explicit permission to connect to audio or video on the current site.

This can happen because:

  • Host permission — the main page domain requires permission.
  • Embedded player — an embedded player (e.g. a YouTube video on a third-party site) is on a different domain that also needs permission.

What to do

  1. Click Allow access in the message.
  2. Approve the browser permission prompt that appears.
  3. The extension will reconnect automatically.

Keep the permission enabled for that site so Transpose reconnects on future visits.

If it keeps asking

  • Allow access once for each domain that prompts — the host page and an embedded player may be on different domains.
  • If a VPN, ad blocker, or privacy extension is blocking the permission prompt, disable it temporarily and try again.
  • On managed/work/school devices, browser policies may prevent granting permissions. Use Tab audio mode as a fallback: Settings Tab audio mode.

Reconnecting (permission already granted)

The message "Activate Transpose from the browser toolbar to continue on this page." means permission is already granted but the connection to the page was interrupted.

This can happen when:

  • You navigated to a different page while the side panel was open.
  • The page was reloaded.
  • The extension was updated or the content script was unloaded (e.g. tab was discarded by the browser).

What to do

  1. Click the Transpose extension icon in the toolbar to re-inject and reconnect on the current page.
  2. If that doesn't work, close and reopen the side panel.
  3. Popup: Close the popup and reopen it on the new page.
  4. If Transpose still does not connect, reload the page.

After re-activation, Transpose reconnects automatically if media is playing on the page.

Transpose extension icon in Chrome/Edge toolbar

troubleshooting activation required allow access add permissions connection disconnected reconnect

Message: "Start playback"

Transpose shows "Start playback" with the message "Start audio or video on this page to activate Transpose." This means media exists on the page but is not yet playing, or a page reload or tab navigation caused the connection to go stale.

What to do

  1. Press Play in the site's player to start audio or video.
  2. If Transpose still does not connect after playback starts, reload the page and open the extension again.

troubleshooting start playback connection no media

Message: "Pitch not available"

These messages appear when Transpose can detect audio playing on the page but cannot attach its pitch processor directly to the media element:

  • Pitch not available"Use tab capture to continue with pitch shifting on this page."
  • No compatible player detected"Audio is playing, but no compatible player was detected."

This typically happens on sites that use protected, non-standard, or offscreen audio routing.

What to do

Switch to Tab audio mode as a fallback:

  1. Click the Use tab capture button, or go to Settings Tab audio mode.
  2. Approve the browser capture prompt if it appears.
  3. Pitch and speed control will be available for all audio on the tab.

If other audio/video extensions are installed, try disabling them — they can conflict with Transpose's audio processing.

On many sites, playback controls (play, loop, markers) still work via the direct connection — only the pitch processing is handled through tab audio.

troubleshooting pitch not available no compatible player detected tab capture tab audio connection

What is Tab Capture mode?

Tab Capture processes all audio from the browser tab.

Use it when direct access to a video/audio element is blocked.

When to use it

  • The extension shows "No media" or cannot detect a compatible player.
  • The site uses a non-standard audio setup that blocks direct connection.

How to start Tab Capture

  • Use the action when shown in connection/troubleshooting messages, or open Settings Tab audio mode.

How to exit Tab Capture

  • Open Settings and turn off the Tab audio mode toggle, or close and reopen the extension on the page.

tab capture tabcapture troubleshooting settings no media

Audio quality issues: glitches, stuttering, distortion

Free and Pro versions both depend on device performance.

Tips:

  • Close other tabs and applications.
  • Disable unnecessary extensions.
  • Check your task manager for background processes (e.g. updates, backups, virus scans) that may affect audio performance.
  • Restart browser or computer.
  • Check sound card sample rate (48kHz recommended).
  • On weaker PCs, glitches can still occur — even with Pro.

Pro users:

  • Pro uses an improved algorithm that reduces clicks and noise.
  • Delay is much lower compared to Transpose Classic.

troubleshooting audio quality glitches jitter stuttering distortion performance noise

Why is there a delay between audio and video?

Pitch shifting requires buffering the audio (200–400ms).

This delay between audio and video is normal in Transpose Classic.

Actual delay can vary by device performance, browser load, and site/player behavior.

The Pro version uses a different audio engine with much better latency by default. Pro also has a Low Latency mode (Settings Audio engine options) for even lower delay — ideal for instrument-following or call-and-response practice.

delay latency sync lag classic pro low latency

Do Pro users have less delay?

Yes.

Transpose Pro uses a more advanced algorithm with:

  • Minimal audio delay (much closer sync with video).
  • Fewer clicks and artifacts.
  • More natural sound, especially at extreme pitch or speed changes.

Low Latency mode

Pro also includes a Low Latency mode (Settings Audio engine options) that further minimizes perceived delay at the cost of some audio quality. Useful for instrument-following drills or any situation where immediate response matters more than maximum fidelity.

Note: Low Latency mode is not available while Formant shifting is active.

delay latency sync lag pro version features low latency

Can I use local audio or video files?

Yes.

  1. Open the extension settings (More options icon Play local file).
  2. Choose an audio or video file (mp3, wav, mp4, mov, etc.) from your computer.
  3. Play it and adjust pitch/speed/loops.

local files mp3 wav mp4 mov video offline from computer

Can I save audio to a file?

No.

Saving audio streams (e.g. from YouTube) is not allowed by their Terms of Service.

For offline editing, use tools like Audacity with local files.

save export download record audacity mp3

Can I use Transpose with Chromecast?

Yes, but only when you cast your desktop.

Transpose works by processing audio in your desktop browser tab before casting; it does not provide native Chromecast app/device integration.

chromecast casting tv

What is Auto Save?

When a new video starts and you make a change to the Transpose controls, it is saved in your Recent history automatically. The video settings are recalled automatically if you play the video later again and open Transpose.

  • You can disable Auto Save in Settings.

Related setting: Remember settings

  • Remember settings keeps your last-used values (pitch, speed, etc.) as the startup defaults for new media, even when Auto Reset is on.
  • Disable it if you prefer starting fresh on every video.

settings auto save default remember settings

Auto Save history not saved after closing Chrome

If Auto Save is enabled and your recent history or video settings are missing after closing Chrome, check the following:

  • Use Chrome in a normal profile (not Guest or Incognito). You can see this at the top right next to the address bar.
  • Make sure Chrome is not clearing site data on exit. Check Chrome Settings -> Privacy and security, and any cleanup tools you use.
  • Ensure Chrome Sync is enabled, with extensions and settings included. Check Chrome Settings -> You and Google -> Sync and Google services, then Manage what you sync.

auto save history settings video sync chrome troubleshooting

What is Auto Reset?

When a new video starts, Auto Reset resets the controls back to their defaults — so each video starts fresh.

  • Previous settings are saved to history first, if Auto Save is on.
  • You can disable Auto Reset in Settings if you prefer your current settings to carry over to the next video in the same tab.

Interaction with Remember settings

  • Remember settings and Auto Reset work differently:
    • Auto Reset on → each new video starts from defaults.
    • Remember settings on → each new video starts from your last-used values (pitch, speed, transpose, etc.), even across sessions.
    • Enable one or the other depending on whether you want a clean slate or a consistent personal baseline.

settings auto reset default remember settings

How do loops work in Transpose Classic?

Transpose Classic has a simpler loop system with basic markers.

Adding markers

  • Click the bookmark icon to save the current time as a marker.
  • Each marker shows its time and optional label.

Using markers

  • Click the → jump icon to move playback to that marker.
  • If two markers follow each other in time, you can loop that segment by clicking the loop icon between them.

Loop toolbar options

  • Repeat song → loop the entire track.
  • Count in → wait a few seconds before each loop repeat.
  • Sort → reorder markers chronologically.
  • Add → create a new marker at the current time.

Free loops are handy for quick practice ranges, but they lack the higher precision, editing, and sequencing options of Pro advanced loops.

free features looping loops markers

Advanced loops

In Transpose Pro, loops are much more precise and flexible than in Transpose Classic.

They use a higher-accuracy algorithm and frame-based timing for smooth, gapless playback.

Pro timeline with markers and loop range selected

Markers and the timeline

  • Markers appear as numbered circles (1, 2, 3 …) along the timeline.
  • Click any marker to jump playback to that position.
  • Click anywhere on the timeline bar to jump; when paused you get a short (≈300 ms) preview (scrub time configurable in Settings).
  • Click the + button to add a new marker at the current playback time.
  • Markers are always sorted by time automatically.

Selecting a loop range

  • Click the Range button to enter range-select mode.
  • If there are only two markers, they are auto-selected as the loop range and the loop icon is enabled.
  • If there are more markers, the marker buttons start blinking — click once to choose the start marker, click again to choose the end marker.
  • The selected range is highlighted on the timeline and on the marker chips below it.
Selecting a loop range in list view

Setting range in marker list view

Tip: Long-press any marker button to enter range-select mode directly.

Loop toolbar icons

Toolbar actions (left to right)

  • Select loop range — select start/end markers for a loop.
  • Add a marker — create a marker at the current time.
  • Add to clips — save the selected range as a clip (see below).
  • Loop — activate or deactivate loop playback.
  • Repeat song — loop the entire track.
  • Count in — wait a few seconds before each loop repeat.
  • Edit — switch to edit mode to rename or adjust markers.
  • List view / Blocks view — switch between chip view and list view.

Editing markers

Click the edit icon or the list toggle to switch to the marker list view, where you can:

  • Rename each marker's label.
  • Edit the exact timestamp directly.
  • Set a marker to the current playback position ().

Tip: Combine advanced loops with clips (see Clips and sequences) to build step-by-step practice sequences.

pro features looping loops markers clips timeline

Clips and sequences

In Transpose Pro, practice fragments are stored as clips.

A clip is a saved audio range (loop) with its own name, time range, and effect settings — like a bookmark with memory. Clips are tied to a specific section of one track, while saved songs are whole-track entries you can recall later.

Pro UI showing markers, timeline and clips panel

Creating a clip

  1. Set markers to define the section you want to practice (see Advanced loops).
  2. Select a range by choosing a start and end marker.
  3. Click the scissors icon to save the selected range as a clip.

The clip is added to the Clips panel below the markers. In the screenshot above, two clips were created from a song: "Pre" (01:42.4 → 01:54.7) and "Solo" (02:08.6 → 02:32.4).

Clip controls

Each clip card shows:

  • Name — editable label (e.g. "Pre", "Solo"). Click to rename.
  • Time range — start and end timestamps. Click either to adjust.
  • On/off toggle — enable or skip the clip in the sequence without deleting it.
  • Drag handle — reorder clips by dragging.

At the bottom of each clip:

  • Play — start playback from this clip; the sequence continues after it.
  • Repeat count — how many times the clip loops before moving on.
  • Count in — wait a few seconds before each loop repeat.
  • More — duplicate or delete the clip.

Adding parameters to a clip

  • Click the + button inside a clip to attach settings such as speed, transpose, formant, or vocal reducer.
  • Each clip remembers its own parameter values, so you can practice the same fragment at different speeds or keys.

Building a practice sequence

  • Chain multiple clips together to form a step-by-step practice flow.
  • For example: play the Pre section at normal speed → repeat the Solo section at 75% speed → repeat the Solo again at full speed.
  • Toggle individual clips on/off to focus on specific parts without rebuilding the sequence.
  • The loop icon next to "Clips" repeats the entire clip sequence.
Repeating a clip at increasing speed

Repeating solo at increasing speed

Clips let you practice methodically — gradually increasing speed, changing pitch, or isolating sections — without resetting settings manually each time.

pro features clips sequences looping fragments

What is Varispeed?

Varispeed links pitch and speed together, like a tape deck or turntable — speeding up also raises pitch, slowing down lowers it.

  • Toggle Varispeed in the Speed/Pitch panel to enable the linked behavior.
  • Useful when you want a natural, analog-style pitch-speed relationship rather than independent control.

Range and quality

Varispeed only allows a small pitch range (around −2 to +2 semitones). This is by design: within that range, no time-stretch processing is needed, which means the audio stays at its highest possible quality with no stretching artifacts. It is the best choice when you only need a slight pitch correction or fine-tuning.

Pro: Varispeed is available in Pro Trial and Pro Active.

varispeed pitch speed features linked pro quality

What is Extended Range?

By default, Transpose shifts pitch by up to ±12 semitones (one octave up or down).

Enable Extended Range in Settings to expand this to ±36 semitones — three full octaves in either direction.

  • Useful for extreme key shifts, analysis, or specialized practice needs.
  • Available for all users (Free and Pro).
  • In Varispeed mode, the range remains constrained to the tighter linked pitch-speed limits regardless of this setting.

extended range transpose semitones settings features

What is Reference Tuning?

Reference Tuning lets you match Transpose to recordings or instruments that use a non-standard pitch standard.

The default is A = 440 Hz (modern international standard). Some recordings, orchestras, or instruments use a different tuning — for example Baroque ensembles often use A = 415 Hz, and some recordings use 432 Hz or 443 Hz. If you practice along with such material, everything will feel slightly off even when the transposition looks correct.

How it works

Reference Tuning uses two independent values:

  • Track tuning — the pitch standard of the recording you are playing along with.
  • Instrument tuning — the pitch standard of your instrument or ensemble.

Transpose calculates the difference and applies it automatically so your pitch adjustments stay in tune with both.

Practical workflow

  1. Enable Reference Tuning in Settings Audio engine options.
  2. In the Pitch panel, set Track to the recording's tuning frequency.
  3. Set Instrument to your instrument's tuning frequency.
  4. Transpose and Pitch values now reflect the corrected difference.

Built-in presets

Both Track and Instrument have quick-select presets:

Preset Frequency
French Baroque 392 Hz
Baroque 415 Hz
Classical 430 Hz
Earth frequency 432 Hz
Modern 440 Hz
442 Hz
443 Hz
445 Hz
Chorton 465 Hz

Pro: Reference Tuning is available in Pro Trial and Pro Active.

pro features reference tuning tuning 432hz 440hz baroque pitch settings

What is Formant control?

Formant control changes the timbre (voice color) without affecting pitch.

  • Useful for adapting male ↔ female voice range.
  • Can make instruments sound darker or brighter.

pro features formant timbre voice sound quality

Using the Vocal Reducer

The Vocal Reducer lowers vocals in stereo music tracks so you can practice along more easily. Use it as a voice reducer on YouTube or any other site Transpose supports.

It intelligently targets center-panned vocals across multiple frequency ranges while preserving the instruments around them, more precise than basic vocal removal tools.

It works best on commercially mixed stereo tracks where vocals are centered. It will not fully isolate or remove vocals; it is designed as a practice and karaoke tool, not a studio separator. Results vary depending on the mix.

Vocal Reducer controls

Controls:

  • Vocal Reducer (Amount)

    The main dry/wet control. Drag it up to hear more of the reduced signal.

    • 0% — original audio, no processing.
    • 100% — fully processed signal only.
    • Start here and increase until vocals are sufficiently reduced.
  • Intensity

    Controls how aggressively the reducer suppresses detected vocal content.

    • Low values give a subtle, natural-sounding reduction — good for light vocal lowering while keeping the mix intact.
    • High values apply deeper suppression in the vocal bands, which can remove more of the vocal but may introduce slight artifacts on some tracks.
    • Works together with Amount: Amount controls how much of the processed signal you hear, while Intensity controls how hard the processing works.
  • Focus

    Controls how narrowly the reducer targets vocal frequencies.

    • Wide (left) — broader reduction across a wider frequency range. Catches more of the vocal but may slightly affect nearby instruments like piano or guitar.
    • Narrow (right) — surgical, precise cuts focused tightly on the detected vocal content. Better for preserving instruments, but may miss vocals that move around in frequency.
    • For most pop/rock tracks, a moderate setting works well. Use narrow for tracks with busy arrangements.
  • Range (Low Hz / High Hz)

    A dual-handle slider that defines which frequencies the reducer is active on (20 Hz – 20 kHz, logarithmic scale).

    • Low Hz (default 120 Hz) — frequencies below this pass through untouched. Keeps bass and kick drum intact.
    • High Hz (default 6000 Hz) — frequencies above this pass through untouched. Preserves cymbals, hi-hats, and high-frequency shimmer.
    • Narrowing the range focuses the reduction on the vocal band and reduces side effects on instruments outside that range.
  • Stereo Bias

    Shifts the center detection point left or right.

    • Default is center (0).
    • If the vocal in a particular track is panned slightly off-center, adjust this to better target it.
    • L = shift detection toward the left channel, R = toward the right.

Tips:

  • Start with the Amount slider and increase until vocals are noticeably reduced. Then fine-tune with the other controls.
  • If instruments are being affected, try narrowing the Focus or tightening the Range.
  • Works best on stereo tracks. Mono audio is passed through unprocessed.
  • For backing-track practice, combine the Vocal Reducer with pitch shift and speed control.

pro features vocal reducer karaoke remove vocals practice voice reducer

Shaping tone with the Equalizer

The Equalizer (EQ) lets you shape the tone of the audio by boosting or cutting specific frequency ranges. It is useful for making instruments stand out, reducing muddiness, or adjusting the overall sound to your preference while practicing.

The EQ has 6 bands, each represented as a colored dot on a visual frequency curve. You can drag the dots up or down to boost or cut, and left or right to change the target frequency.

Equalizer controls

Bands and their default roles:

Band Default type Default frequency Typical use
1 High Pass 30 Hz Cuts rumble and sub-bass below a cutoff point
2 Low Shelf 120 Hz Boosts or cuts the bass region as a whole
3 Peaking 350 Hz Targets the low-mid range (warmth, muddiness)
4 Peaking 1200 Hz Targets the mid range (vocals, guitar body)
5 Peaking 3500 Hz Targets the upper-mid/presence range (clarity, bite)
6 High Shelf 9000 Hz Boosts or cuts the treble region as a whole

How to use it:

  • Toggle on/off — use the switch in the header to enable or disable the entire EQ without losing your settings.
  • Drag dots — on the visual curve, drag any band dot up/down to change gain (±12 dB) or left/right to shift its frequency.
  • Select a band — click a band in the strip below the curve to see its details and adjust the filter type and Q.
  • Filter type — click the type label (e.g. "Peak", "Lo Shelf") to change it. Available types: High Pass, Low Pass, Peaking, Low Shelf, High Shelf, and Notch.
  • Q (quality) — controls how wide or narrow the filter's effect is. A low Q affects a broad range; a high Q focuses on a narrow band. Use the +/− buttons to adjust.
  • Presets — click the menu to choose from built-in presets.
  • Reset — use the refresh button to return all bands to flat (0 dB).

Built-in presets:

  • Flat — all bands at 0 dB (reset)
  • Backing Track Scoop — reduces mids to push vocals back; good for play-along
  • Bass Cut / Bass Boost — reduce or emphasize low frequencies
  • Mid Scoop — dip the midrange for a more scooped, modern sound
  • Treble Cut — tame harsh or bright recordings
  • Loudness — classic loudness curve: boosted bass and treble
  • Warmth / Brightness — shift the tonal balance warmer or brighter
  • Presence Boost — bring out vocal and instrument clarity
  • Speech Clarity — optimize for spoken content or vocal lessons
  • De-Mud — reduce the muddy 200–800 Hz range
  • Harshness Cut — soften the 2–5 kHz region that can sound fatiguing

Tips:

  • Start with a preset that sounds close to what you want, then fine-tune individual bands.
  • Small adjustments (2–4 dB) usually sound more natural than extreme boosts or cuts.
  • Combine the EQ with the Vocal Reducer for more control when practicing with backing tracks.

pro features equalizer eq tone frequency bass treble presets

Do my settings sync between devices?

Yes.

  • Sign in with your Google account.
  • Your saved songs, playlists, clips, sequences, and history sync across desktop Chrome where you are signed in with the same Google account.
  • No manual export or import needed.

Pro: Cloud sync is a Pro feature. Classic stores settings locally in the browser only.

pro sync account devices cloud sync songs playlists clips

How do I save songs to a playlist?

The Workspace has a History section with two tabs: Recent and Saved.

  • Recent shows your automatically saved history (when Auto Save is on). Click any item to return to that media with its saved settings visible.
  • Saved is your personal library, organized in playlists.

Saving a song

  1. While playing, click the Save button in the toolbar.
  2. Choose Save as new version or update an existing entry.
  3. Select an existing playlist or create a new one.

Managing playlists

  • Rename or delete a playlist from its menu.
  • Sort songs by date or name.
  • Edit a song's name or move it to a different playlist.

Pro: The Saved tab and playlist organization are Pro features. Classic has access to Recent history only.

pro features history saved playlist save cloud songs library

How do Scenes and the Workspace layout work?

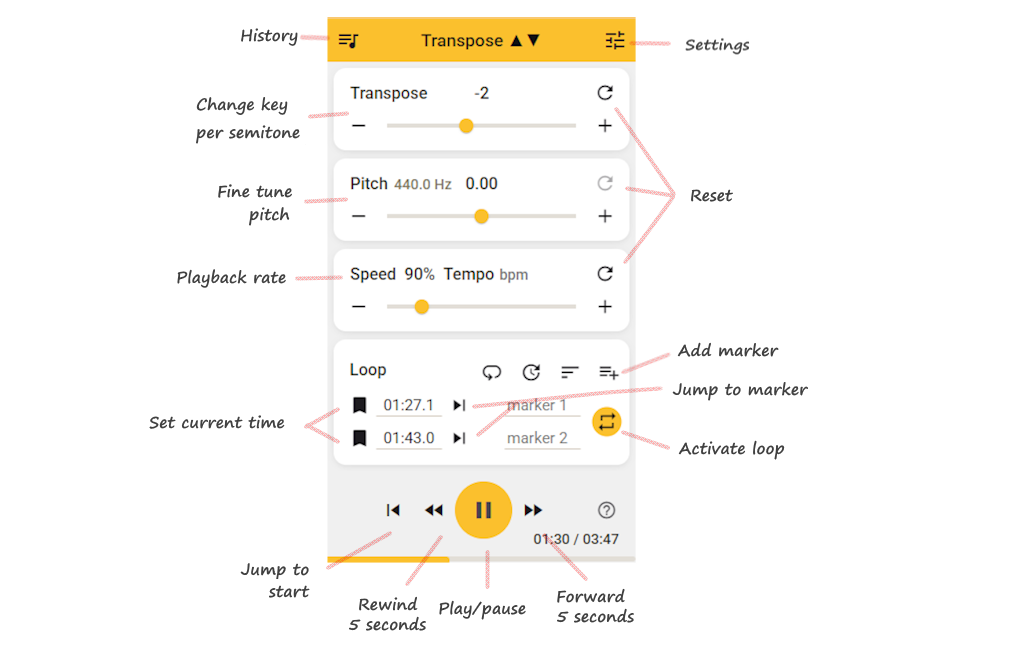
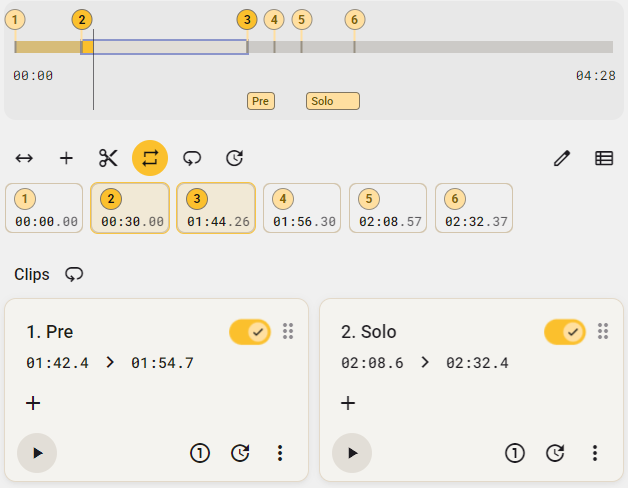
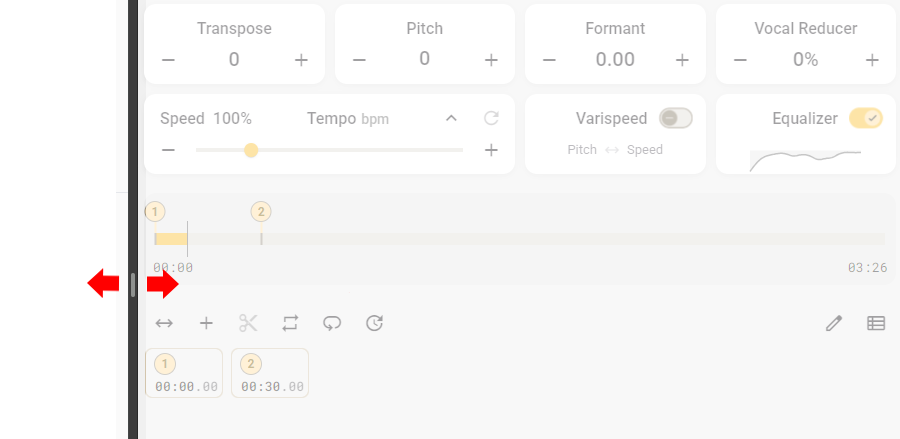
The Workspace is Transpose Pro's dedicated side panel, always visible alongside the page you are playing. You can resize it by dragging the left edge of the panel — widen it to see more controls at a glance, or narrow it when you need more room for the page.

Resizing the side panel

Scenes

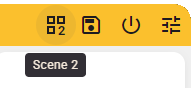
Scenes let you create different panel layouts for different workflows. Transpose Pro comes with three scenes — cycle through them by clicking the Scene button in the toolbar.

Scene toggle button in the toolbar

The built-in defaults are:

  • Scene 1 — All-round: Transpose expanded; everything else collapsed but available.
  • Scene 2 — Practice: Speed and Notes expanded; pitch-related panels hidden for a cleaner view.
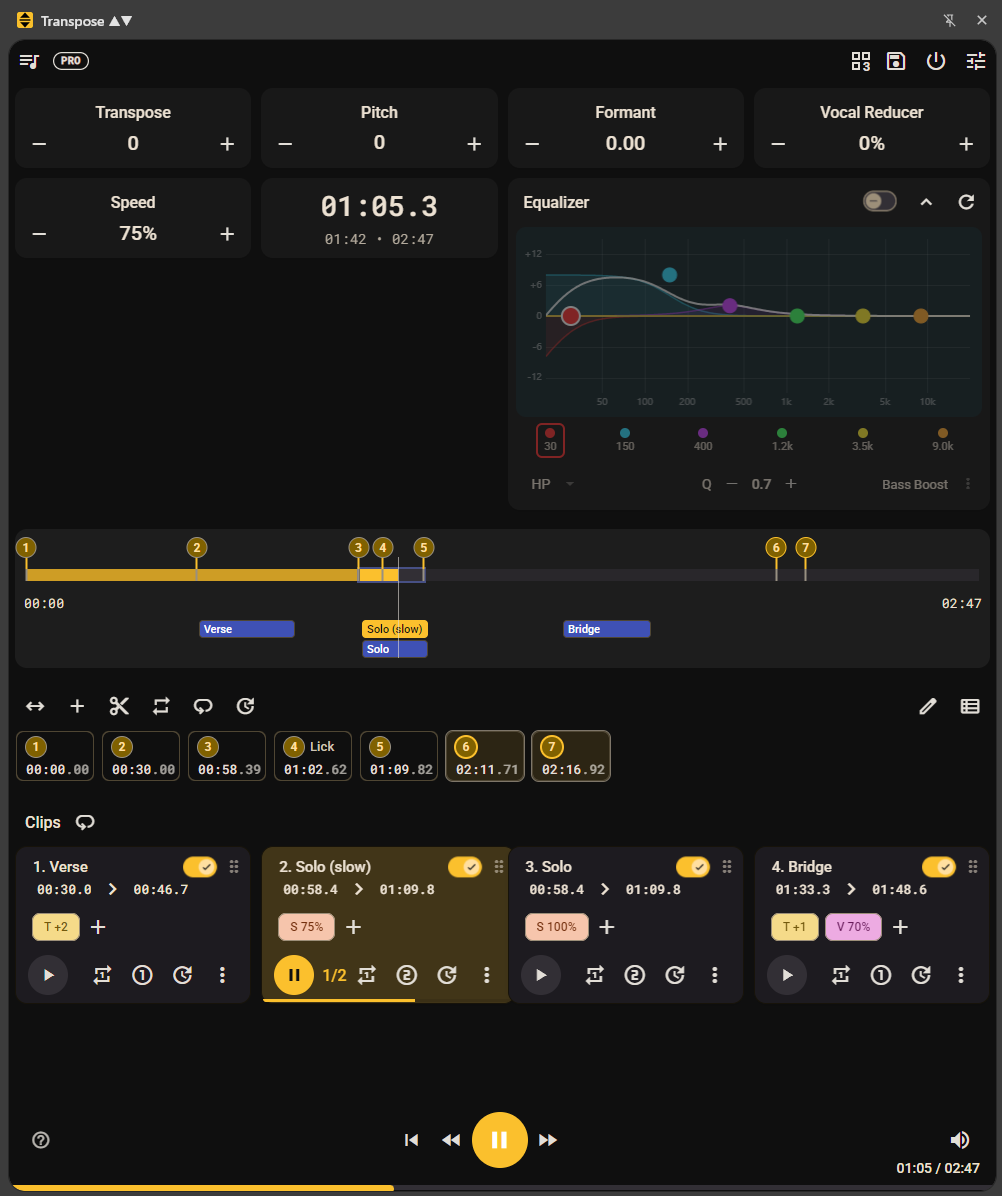
  • Scene 3 — Full Mix: Transpose, Pitch, and Equalizer expanded for full production control.

You can fully customize each scene. Any changes you make (expand, collapse, enable, disable, reorder) are saved to the active scene automatically.

Enabling and disabling panels

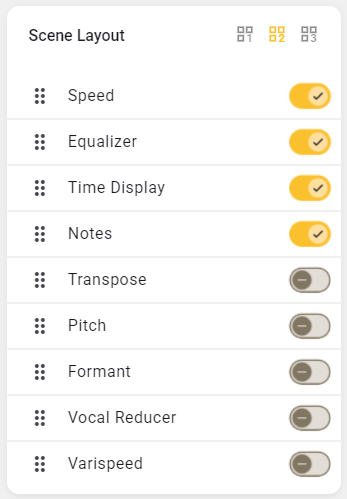
Open the Scene Layout panel (click the scene icon ▸ Scene Layout) to see all nine available panels: 
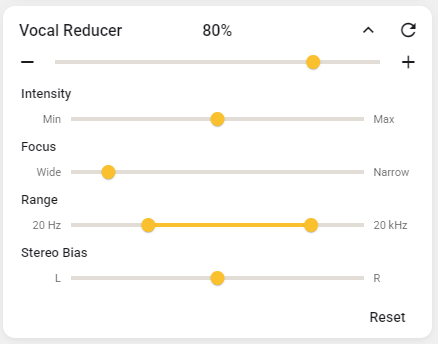
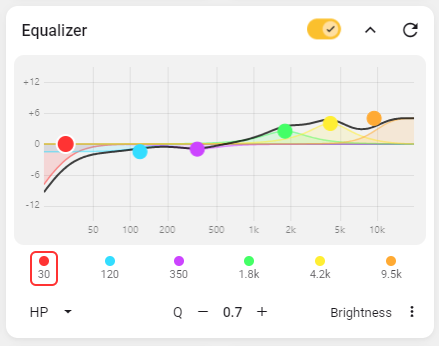
Transpose, Pitch, Formant, Vocal Reducer, Equalizer, Speed, Varispeed, Time Display, Notes.

  • Toggle on — the panel appears in your workspace.
  • Toggle off — the panel is hidden entirely.
  • Drag the grip handle to reorder panels.
Scene Layout panel showing enable/disable toggles

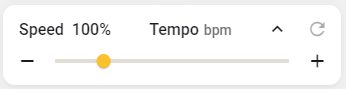
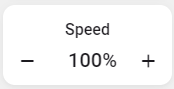
Expanding and collapsing panels

Each enabled panel can be expanded or collapsed by clicking its header:

  • Expanded — shows the full control: slider, value, and additional options.
  • Collapsed — shows only the panel name and current value for a compact overview.
Speed panel expanded Speed panel collapsed

Each scene remembers which panels are expanded or collapsed, so switching scenes instantly restores your preferred layout.

Resetting scenes

To restore all scenes to their factory defaults, open Settings Reset Scenes.

Pro: Scenes and the Workspace are available in Pro.

pro features workspace scenes layout side panel expand collapse enable disable resize panels

Can I also use the popup instead of the Workspace?

Yes, you can easily switch between the two interfaces. Open the Settings page at the top right, then choose Open in popup or Open in side panel .

Pro keeps the improved audio engine in popup mode.

pro workspace side panel popup

Can I control Transpose with keyboard shortcuts?

Yes. Transpose has built-in keyboard shortcuts for the most common actions.

Default shortcuts

Action Key
Play / Pause Space, Enter
Transpose up Arrow Up
Transpose down Arrow Down
Pitch up Shift + Arrow Up
Pitch down Shift + Arrow Down
Speed up = / Numpad +
Speed down - / Numpad -
Seek forward Arrow Right
Seek backward Arrow Left
Toggle loop L
Add marker M
Jump to marker 1–9 Digit 1–9

Shortcuts are active when the extension panel is focused. They are automatically disabled when typing in text inputs.

Custom shortcuts (Pro)

Pro users can remap any shortcut. Go to Settings Keyboard shortcutsCustom shortcuts, then click any action to reassign it.

keyboard shortcuts hotkeys keys pro features settings

How do I start the free trial?

Click Try Pro in the extension.

  • Sign in with Google.
  • The Workspace opens in the side panel and starts your free trial.
  • You do not need to enter payment details to start the trial.
  • The trial stops automatically after 7 days.
  • If you want to stop earlier, sign out in Settings and you will have Classic again.

Free: Works on desktop Chrome, Edge, and most Chromium-based browsers.

Pro: Available only in Google Chrome on desktop.

Start Pro Trial

pro trial account free trial

Why do I need to sign in with Google?

Transpose uses Google Sign-In to provide a secure and simple login experience.

  • No new password to remember: You can sign in with your existing Google account without creating a new password just for Transpose.
  • Secure: We rely on Google's trusted authentication system to protect your account.
  • Cross-device access: Your Pro subscription is linked to your Google account, so it works automatically on any computer where you're signed in.

We do not currently support other login methods like email and password.

login account password security authentication

How do I subscribe to Pro?

After your trial you can pick:

  • Monthly subscription
  • Annual subscription (discounted)
  • Lifetime access (one-time payment)

Payments are processed by Paddle.

Upgrade

pro subscribe payment paddle billing buy purchase

Do I need to pay again for another computer?

No.

A single Transpose Pro subscription is linked to your Google account, not to a specific device.

  • Sign in with the same Google account on each computer.
  • Your Pro access and saved songs, playlists, clips, loops, and history will be available.

👉 You only need one subscription per Google account, even if you use multiple devices.

pro subscribe payment account devices license

How do I manage or cancel my subscription?

Use the official Paddle Customer Portal to manage your subscription:

👉 Open Customer Portal

From there you can:

  • Manage renewal settings (including cancellation)
  • Update payment method
  • View and download invoices

If you cancel in the portal, your subscription usually stays active until the end of the current billing period, then stops renewing.

pro subscribe cancel paddle billing account manage subscription

How do I update my payment method?

In the Customer PortalPayment methodsUpdate.

pro payment paddle billing account credit card

How do I view or download invoices?

Invoices are available in the Customer Portal.

  • Go to PaymentsView Invoice.
  • Download PDF or request an updated invoice.

billing invoice paddle receipt

What happened to the old Pro version?

In 2021, the Chrome Web Store removed support for paid extensions.

As a result, the original one-time-payment Pro version was made free for everyone.

That version is now called Transpose Classic.

We believe that making music is for everyone. That's why the core of Transpose is a powerful, free tool for your daily practice sessions. It is our contribution to the music community, to help as many people as possible grow and enjoy playing.

The Classic version contains all the features from the original extension.

The new Transpose Pro is an upgraded edition with more advanced features and separate licensing.

If you once bought the old Pro, you now effectively have the same version with Classic.

Upgrading is not required. With Classic you keep the same experience you've always had.

classic free pro history legacy old version

仍需要幫助?

Didn't find what you were looking for? Contact support.

聯絡支援